Saturday, September 21, 2013

How to Get Those Makeup Brushes Squeaky Clean

For those of you who use makeup brushes, you can probably tell when your brushes are getting dirty. The build-up of makeup and oils from your face begin to make the brush feel more stiff, not giving you the best results when applying your makeup.

It is important to cleanse your makeup brushes often, to ensure that bacteria is not able to build-up...we don't want to breakout from bacteria from our brushes getting onto our skin!

To avoid this, we like to cleanse our makeup brushes at least once a week!

Keep reading to see how we like to clean our brushes!

What you need:
- towel
- dirty makeup brushes
- mild shampoo/ soap (we like to use baby shampoo)
- silicon oven mitt (with some sort of texture)

Some of the brushes I used that needed cleaning

The oven mitt I purchased works well to clean my brushes, but if I were to repurchase one, I would get a silicon oven mitt that was made of all silicon (the inside of the mitt has material and sometimes it does get wet).

Silicon oven mitt and baby shampoo

Let's wash our first brush!
First, get your brush fully wet (use warm water).
Next, pour out a little shampoo onto the mitt.


Gently swirl your brush on the mitt and into the shampoo. Keep repeating this motion for about 10-15 seconds. Even though it may look like the makeup is out, you want to ensure that you are cleaning the brush so all the oils (from your face) are being removed too.


Now it's time to rinse your brush!
Turn on that warm water and gently swirl your brush into your mitt (same motion you used to clean it with the shampoo), while under the warm water.
It is important to thoroughly rinse your brush because any shampoo left on the brush can cause problems with the application of your makeup, or worse, make you breakout! 


After rinsing your brush, you will want to squeeze the water out of your brush and reshape the brush (so the hairs/ bristles of the brush do not dry all out of shape).

In the space between the thumb and other fingers, gently squeeze out any excess water from the brush, then reshape the brush.

After completing this step, lie your brush flat on the towel to dry. Repeat this process for each of your brushes. It may take longer than you would like, but it does get the job done effectively!
Depending on the type of brush, I find that it takes anywhere from 12- 24 hours for my brushes to completely dry.
When they are fully dry, they are as good as new and ready to use!

We hope that you try this technique for cleaning your makeup brushes because we find that it cleanses the brushes much better than your bare hand (we used to just use our hand)!

Lots of Love,
sister hearts7


Wednesday, September 18, 2013

Sephora Haul

We love shopping at Sephora! There is rarely a time we leave with nothing.


"Urban Decay Naked 2 Eyeshadow Palette"
"Sephora Favorites Give Me Some Lip Lip Sampler"
"Sephora Favorites Draw the Line Eyeliner Sampler"
"Stilla Stay All Day Waterproof Eye Liner- Intense Black"
"Ralph Lauren- Ralph Eau de Toilette Rollerball" 

Excited to give these products a try! Product reviews hopefully in the near future!

Lots of Love,
sister hearts7


Sunday, September 15, 2013

The Liebster Award :)


We would kindly like to thank Maggie D. of My Chic Adventure for nominating us for the Liebster Award! Definitely check out her blog at http://mychicadventure.blogspot.com/
The Liebster Award is amazing for those of you who are new to the blogging community. It is a great way to become a more integrated part of the blogging community, which can be a fun process!

We were nominated and are going to answer the questions that were left for us on My Chic Adventure. Then we will come up with 10 questions and nominate 10 bloggers who are fairly new to the community (have under 200 followers), on our blog. We are excited to learn a little more about other bloggers in the community!

10 Questions from My Chic Adventure:
  1. What made you want to start blogging?
    • C & T: We are sisters who love looking at blogs and getting inspiration from them! We had been thinking about starting a blog for a while, but finally got one up and running, and we absolutely love it! We are hoping that our blog will also provide others with inspiration as many have done for us!!
  2. What is your favorite part about the blogging community?
    • C & T: Building relationships with other bloggers, getting ideas and feedback from those in the blogging community is amazing! 
  3. What is your favorite social networking site?
    • C & T: We would both have to say that Instagram has been our go-to recently!
  4. Who is your celebrity inspiration?
    • C & T: We both love Lauren Conrad's style! 
    • C: I also love Jessica Alba's sense of fashion and style!
    • T: Ariana Grande's cute and girly style is also an inspiration!
  5. What is your favorite article of clothing?
    • C: I love the winter season! It's hard to choose just one favorite article of clothing, but I would probably have to say that in the winter months I absolutely love my knit tops/sweaters!
    • T: Since summer is my favorite season, high-waisted shorts are a staple for me!
  6. What is one thing you could never live without?
    • C & T: We both couldn't live without our iPhones! Staying connected with friends and family as well as being able to create memories through pictures and videos are very important to both of us.
  7. If you could meet any blogger, who would it be?
    • C: I would love the chance to meet Tiffany from MakeupByTiffanyD. I love watching her youtube videos and love her blog...so many great ideas! Check out her blog at http://makeupbytiffanyd.blogspot.com/ !
    • T: I would love the chance to meet Jen from From Head To Toe because I have learned many great makeup tips from her! Check out her blog at www.frmheadtotoe.com !
  8. What is your favorite beauty product?
    • C: It's so hard for me to just choose one favorite beauty product, as I am constantly trying new products....but if I had to choose, as of now I am really loving my "Kat Von D Tattoo Liner".
    • T: As of now, I have really been loving the "Stila Stay All Day Waterproof Liquid Eye Liner".
  9. If you could go anywhere in the world, where would you go?
    • C: Not having traveled outside the U.S. I think going to Australia, France, and Japan, would be amazing! Hopefully someday in the future I will get the chance! :)
    • T: I would love to explore Japan and France!
  10. What is your favorite store to shop at?
    • C: I definitely love clothing stores, but find that I end up spending way too much at makeup and beauty stores, such as Sephora!
    • T: I have really been loving H&M because they have really cute and affordable clothes!
The bloggers that we would like to tag are:

http://katespitz.blogspot.com/
http://oliviapaige31.blogspot.com/
http://herguiltypleasureblog.blogspot.com/
http://thehannahway.blogspot.com/
http://stylelifelovely.blogspot.com/
http://chicandeverythinginbetween.blogspot.com/
http://cosysaturdaynight.blogspot.com/
http://www.fashionfrostings.blogspot.com/
http://dailyfacebeauty.blogspot.co.uk/
http://www.ninashausofmakeup.blogspot.com/


Questions:
  1. What made you want to start a blog?
  2. What social networking site do you spend the most time on?
  3. What is your favorite store to shop at?
  4. What is your go-to beauty product?
  5. What is your favorite season of the year?
  6. What is your favorite article of clothing?
  7. What is your go-to outfit?
  8. What celebrity best describes your style?
  9. What is one thing that you have always wanted to do/try, but haven't yet?
  10. If you could travel anywhere in the world, where would you go?
For those of you that we tagged, please answer the questions we left for you, come up with 10 questions, and tag another 10 bloggers!

We are looking forward to seeing all the responses to our questions from the bloggers that we tagged! For the bloggers that we tagged, we would love to see your responses...so please leave the link in the comments section! Thank you!!

Lots of Love, 
sister hearts7

Friday, September 13, 2013

Ulta Beauty/ CVS Haul

We recently stopped by Ulta Beauty and CVS and definitely didn't leave empty handed! Ulta is having some great deals this month and definitely couldn't pass it up. Along with this, Ulta's reward program is great as you start to cumulate the points. These points are redeemable for money off your purchases and today we got $17.50 off plus a coupon we got in the mail, $3.50, with a combined total of $21 off our total purchase...awesome!!!

For the most part, we have not tried these products out yet, so we are excited to test them out. The products that we have repurchased are the "Nivea Lip Care" and the "Maybelline The Falsies Volum'Express Mascara." These are two products that we have repurchased multiple times and absolutely love!

"Maybelline Baby Lips Moisturizing Lip Balm- 30 Peach Kiss"
"Maybelline Baby Lips Moisturizing Lip Balm- 15 Cherry Me"
"Nivea Hydrating Lip Care SPF 10"

"Physicians Formula Mineral Wear Mineral Loose Powder- 2452 Buff Beige"
"NYX HD Studio Finishing Powder"

"Maybelline New York The Falsies Volum'Express Waterproof Mascara"- 291 Very Black
"Anastasia Bold Brows Kit"- Dark Brown
"Trim Compact Slant/ Point Tweezer"

We are hoping that these products work well and might do a review on them in the future!

Lots of Love,
sister hearts7


Wednesday, September 11, 2013

Bellabe Facial Hair Removal Use & Review


I wanted to start off by saying that I was looking for something to remove "peach fuzz" on my face so that I would have a smoother application of makeup.


The Bellabe is a spring-like device with two plastic-like ends. It is about 8 inches long (including the plastic ends) and the spring is about 4.25 inches. It is to be used "only on the upper lip, chin, cheek, and neck areas."


To use, you bend the coil in a U shape. Holding the ends, one in each hand, you place the metal coil on the face, in the area where you would like to remove the hair (with the "U-shape" facing downward). The coil should be pointed in the direction closest to the top of your head and the ends (purple plastic ends) should be closest to the bottom of your face. 


While against your face (no need to press it into the skin, just simply place it on the skin), turn the ends in an outward turning motion. At the same time, you are going to want to move the Bellabe upward. If you are doing it correctly, you will be able to feel the hair being pulled out. Continue this motion until the wanted hair is removed!

Review/ First Impression:

After using this for the first time I think it does a pretty good job. I find that I have to repeat the motion a couple of times in the same spot to remove the wanted "peach fuzz," but for the most part, it does remove it. The Bellabe removes the hairs from the root, so there is a little pull (as if plucking the hairs out), but surprisingly, I did not find that it was too painful (only used in the cheek areas). 

I wish that it was a little more effective though because I still find that it does not remove all of the "peach fuzz" that I want.

But after washing my face, after using the Bellabe, my face felt a whole lot smoother! Makeup application was a lot nicer too!

Overall, if you have some "peach fuzz" on your face that you would like to remove, I would give this a try!

Lots of Love,
sister hearts7


Sunday, September 8, 2013

DIY Hair Tie Bow


This is an easy DIY tutorial to make a cute hair tie bow. You can make so many different hairstyles with this hair tie whether you're going to school or just going out it makes any outfit look a little more girly and put together!! I personally saw these when I was shopping but didn't want to buy something when I knew I could make it for much cheaper! So I decided to make my own and I've been wearing them ever since! 

The supplies you need are...
-ruler
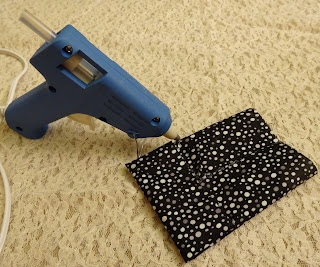
-hot glue gun
-scissors
-hair tie
-fabric
                                   

The first thing you are going to do is lay out your fabric and measure a 6 inch by 6 inch square. Then cut it out so you have a square of fabric like this. 


Fold the fabric square in half, and this will become the midline of the square. Then fold one side of the square to the midline and glue it down (apply a line of glue along the edge of fabric being glued to the midline).


Once you've folded one side of the square to the midline, fold the other side of the square to the midline so the edges of the fabric meet but they are not overlapping each other. Glue this side down as well.


Now you are going to fold your rectangle in half creating another midline that is perpendicular to the midline you made in the previous step. Fold one side of the rectangle to the midline and glue it down. Next do the same thing to the other side.


Next you are going to give your fabric that signature bow shape. You are going to fold the fabric in strips as if you were making a paper fan. I fold mine 4 times and pinch it in the center to give it the bow shape that I desire. Once you have the bow shape you like, put a dot of hot glue in between each fold you created and squeeze the fabric together so the bow stays pinched without having to hold it together. Do this on the front side of the bow, then flip it over and repeat on the backside of the bow (gluing in between each of the folds).


While you are letting the glue dry, cut a 1 inch wide piece of fabric. Fold the fabric twice so it is as wide or as skinny as you want for the middle of the bow. Glue the fabric together to create a fabric strip.


Next we are going back to the bow. Choose what side of the bow you want as the back of the bow. Then take the hair tie and glue it to the back of the bow in the center.


Now we are going to take the strip of fabric that we made and wrap it around the center of the bow to cover up the hair tie in the back. Wrap the strip around tight and glue it down once you like how it looks and cut off the excess fabric.


This is how it should look after you are done. As you can see the fabric is covering up the part where we glued the hair tie to the bow.


This is the final hair tie bow!! You can make it out of any fabric and it's so easy I'm sure you will end up making all different colors! Hope you try this out!

Lots of Love,
sister hearts7


Saturday, September 7, 2013

Colorful Cakes in a Jar!

Making individual cakes, especially ones with lots of color are fun and exciting! 
These cakes are easier to make than they look!
Super easy and great for any occasion!!


Cake in a Jar Recipe (yields 6 cakes in a jar)

Ingredients:

- 2 boxes of white cake mix
      *Need ingredients to make cake mix (according to box)

-  food coloring (up to five colors)

- vanilla frosting

- sprinkles

*6 one-pint jars with covers, washed and sprayed with non-stick cooking spray

Making the cakes:

1) Preheat oven to 350 degrees Fahrenheit

2) Make the cake mix according to the preparation instructions on the boxes

3) Divide cake mix, fairly evenly, into separate bowls (the number of bowls 
    depends on how many different colors you are using)

4) Mix food coloring into the white cake mix (to the desired color)

5) Spoon fairly equal amounts of each batter color into each of the jars
       *Do not fill the jars to the very top, as they will rise when baked

6) Place each of the filled jars in a baking dish filled with about one-fourth to one-half inch of water

7) Place in oven and bake for 30- 40 minutes
       *Use a skewer to poke cake in the center to check if it is cooked all the way through
         (skewer should come out clean if it is fully cooked)

8) Place cakes on a cooling rack and let cool completely

Decorating the cakes:

1) Scoop the tops of the cakes off and level them off (try to make it a flat surface)
       *Scoop enough cake off so that you have room for frosting, sprinkles, and cover
       **Optional: Save the cake you scooped out and crumble to add on top of the frosting later

2) Add your frosting

3) Top it off with your sprinkles and cake crumble (optional)

Enjoy!!

------------------------------------------------------------------------------------------------------------
DETAILED RECIPE:

Recipe makes 6 one-pint cake jars

What you need:
- 6 one-pint jars with covers
- 2 boxes of white cake mix
      *Need ingredients to make cake mix (according to box)
- food coloring (up to five colors)
- vanilla frosting
- sprinkles

*Before beginning the cakes, wash your jars and covers
*Let the jars air dry or thoroughly dry them
*Spray the insides of the jars with a non-stick spray
*Set aside for later
*Preheat oven to 350 degrees Fahrenheit 

Time to Make the Cakes:
- Take your 2 boxes of white cake mix and make the cake according to the preparation 
   instructions on the boxes
- Take your mix and divide them evenly among separate bowls (the number of bowls 
   depends on how many different colors you are using)
- Mix food coloring into the white cake mix (to the desired color)

Example of two of our colors in separate bowls
- Spoon fairly equal amounts of each colored batter into the jar
      *After spooning each layer in you are going to want to slightly tilt the jar a little and 
       carefully swirl it in a clockwise motion--so that the colors get distributed on the walls 
       of the jar (repeat with each layer)
      *Do not fill the jars to the very top, as they will rise when baked
- Place each of the jars of batter in a baking dish and fill the baking dish with about half an 
   inch of water
- Place in oven and bake for 30- 40 minutes

Jars of batter getting ready to be baked!
- To check if cake is fully cooked, use a skewer and poke down the center, all the way to 
   the bottom of the jar, and then pull straight out
       *If it comes out clean (no liquid batter stuck to it), then they are fully cooked!

Baked cakes!

- Once fully cooked, take out of oven and place jars on a cooling rack
- Let cakes cool completely

Cakes on the cooling rack

- Carefully scoop some of the excess cake out with a spoon
       *Enough so that you have room to add frosting to the tops 
       *Optional: save the scooped out cake tops and crumble to add to top after frosting
- Once the tops of the cakes are fairly flat, start adding your frosting
- Top cakes with sprinkles and cake crumble (optional)
- The cakes are complete!!
       *Add the cover and dress it up with some ribbon!

Completed cake in a jar!!

Dig in and enjoy these delicious colorful cakes in a jar!!

Lots of Love,
sister hearts7


Friday, September 6, 2013

Natural Fall Monolid Makeup

This is a fall monolid makeup that I came up with. I've been wearing this look a lot lately since fall is just right around the corner! I used warm neutral colors to keep the eye looking natural. Hope you enjoy!


The products I used were...
-The Lorac Pro Palette
-Urban Decay Primer Potion
-Maybelline The Falsies Big Eye Waterproof Mascara (Black)
-Maybelline The Falsies Volum' Express Waterproof Mascar (Black)
-Urban Decay 24/7 Waterproof Liquid Eyeliner Perversion (Black)
-Benefit Eyebright
-Urban Decay 24/7 Glide-On Eye Pencil (Lucky)
-Urban Decay 24/7 Eye Pencil (Demolition)
-Sonia Kashuk Fluffy Blending Brush
-Sephora Double Ended Eyeshadow Brush
-ELF Eyeshadow Brush
-Sonia Kashuk Eyeshadow Brush
-KOJI #73 Eyelash Curler 


 First start off with nothing on your eyelid. Also I lightly filled in my eyebrow to keep the look natural.


The first color we are using is "GARNET", which is a shimmery copper orange color. We are going to put this all over our lid with the Sephora double ended eyeshadow brush. When you apply this do not go any higher than your natural crease which is where your eye socket bone is.


The second color we are using is "SABLE", which is a matte medium brown color. We are going to apply this to the middle of our eye with the Sephora double ended eyeshadow brush.


The third color we are using is "ESPRESSO", which is a matte dark brown color. We are going to apply this to the outer v portion of our lid with the ELF eyeshadow brush. We want to apply this color in the same angle as our lower lash line. 


 This is what your eyelid should look like at this step. We are now going to take the Sonia Kashuk fluffy blending brush and blend out any harsh lines, do not add any eyeshadow on the blending brush.


 Next we are taking the Urban Decay liquid liner and line the upper lash line. I also winged it out to elongate my eye but this is an optional step.


 I then highlighted my brow bone with the color "CREAM", which is a matte cream shadow. 


 Next I curled my eyelashes and applied one coat of Maybelline Big Eyes mascara with the upper lash side of the mascara. Then I applied one coat of Maybelline The Falsies mascara to my upper lashes to volumize them more. Then I used the lower lash side of the Maybelline Big Eyes mascara and applied this to my lower lashes.


This is the last step. I tight lined my upper lash line with my Urban Decay liner pencil in "DEMOLITION" and also used this to line the outer part of my water line. Then I used the Urban Decay liner pencil in "LUCKY" and applied this to my water line closer to my tear duct. Next I used the Benefit Eye Bright and applied this to the inner corner of my eye and used my finger to blend it out so it wasn't so harsh. And this is my final natural fall monolid look!! I did not use any false lashes however if you would like to enhance the look, you can feel free to add your go to false lashes. Hope you try this look out for this upcoming season or just as an everyday look!!

Lots of Love,
sister hearts7